Most of the grumbling herein refers to software not acting the way it should. Of course, computer fuck ups are not solely related to software. I therefore take this opportunity to present the saga that was my recent hardware failure fuck up.
There comes a time in a PC owner's life when the game plays like a slide show, video takes an age to encode and Windows takes about three ice ages to boot. It is the time of an upgrade. This year, I reached such a time. My general rule is that if it doesn't double performance, it's not worth buying. I was running a 2.2Ghz Athlon X2, with 2Gb of RAM and a 9600GT graphics card. I was also using a 750Gb HDD.
When I purchased my last motherboard I wanted to keep the RAM I had so I went for the socket 939 chipset instead of the newer AM2. This was, ultimately a mistake, because it meant that this time around I could not just buy a brand new AM2/AM3 Athlon/Phenom. The only 939 chips still on sale are only marginally faster than the chip that I had. So, new platform then.
At the time of writing there is a clear leader in home PC enthusiast CPU's. It is the Intel i5 750. This is a Quad core processor running at 2.66Ghz. It has a nifty facility whereby one can reduce the number of cores in use and boost the speed up to a max of 3.2Ghz. You get the best of both single/multi core worlds in other words.
The motherboard I went for is the Gigabyte GA-P55M-UD2. It comes highly recommended for the i5 750. To this I added 4Gb of G.Skill 12800 DDR3 RAM. All that guff means that it is rated to run at (12800/8(bits)) or 1600Mhz.
My biggest decision was whether to get a new graphics card (specifically the ATI 5770) or a Solid State Disk. A 64Gb SSD is about the same price as that graphics card. It is also the first size of SSD that actually makes sense. You can install Windows and a couple of games in 64Gb. Large video files, iTunes libraries and so forth, do not require a speedy SSD, so that can happily still take up room on the 750Gb HDD.
In the end I went for the SDD. I picked up a OCZ Agility drive. I have to say it is not a decision I have regretted. The drive has the fancy new 'Trim' enabled firmware and has performed flawlessly. Until you have actually used an SSD based PC you do not really have an appreciation for how much of a speed increase you get.
As for the graphics, it turns out that the CPU was something of a bottleneck in my old system because the new platform gets much more out of the 9600GT. I can now run the games which really tested my previous set up (Crysis, GTA IV, World in Conflict and Assassin's Creed) on mostly full settings. Bear in mind that my monitor is a 19" 1440x900 job, so the 9600GT does not have to pump around too many pixels.
Anyway, the system ran perfectly sensibly for a month. Then, all of a sudden, it just stopped. As in power off, no start up when button pressed. Now, I admit I had applied a modest overclock to the CPU. If I recall it was running about 3.3Ghz instead of 2.66Ghz. You will find plenty of reports about the chip running at 4Ghz, so I thought I was a-ok.
I am no stranger to overclocking failures, so I tried the usual method of restoring the machine. Step one, wait for the system to cool down. Nothing. Step two, clear the CMOS chip. Nothing. Ah. Something bad has happened. Try another power supply. Oh - lights and the CPU fan spins! For 500 milliseconds. Bad. However the other power supply only had the 20 pin power cable, not the beefier 24 pin. Plus it only had a 4 pin 12v cable and the motherboard needs an 8 pin connection. So, test the first power supply on another machine. Nothing - A HA! Dead power supply. Odd, but not impossible. You see I did not change power supplies when I upgraded the kit. The existing one was a beefy 500W Enermax unit, with all the necessary connections. However it looked like it just wasn't up to the job of overclocking the new kit. So, I order a new 600W power supply. It arrived next day and I fired it up. It behaved in exactly the same way as the older PSU - lights, brief fan spin. Oh bollocks.
I now have RAM, a CPU and a Motherboard. All could be faulty. I have no other machines which use this platform so I cannot test any of them. On balance, and because it is the cheapest to replace I opt to send back the motherboard first. I bought the stuff from ebuyer.com. Their policy is not to accept any returns if you have had the kit for more than 30 days. They just direct you to the manufacturer. This is extremely frustrating. And not entirely legal. There is nothing in the Sale of Goods Act which allows them to adopt this rigid attitude. However, when you have been overclocking you cannot really complain too much. So I emailed Gigabyte. I have not used a manufacturers RMA system before, but I have to say that Gigabyte were excellent. Highly recommended. They asked for some details, and gave me an address and reference number. I boxed up the board and sent it recorded delivery to Gigabyte. Cost was £5.
I sent it to them on a Monday, and by Friday it was back in my hands. They had identified some components on the board which had failed and they had replaced them. Good stuff think I - problem found and fixed. The components were the VRMs which also explained why the PSU had failed.
So, I install the board back into the machine, hook up the new PSU and let rip - and it works. Brilliant. I get all my stupid DRM licences re-activated and get back to the video encoding I was doing when it all went south the first time. I do not, however, overclock the machine. I installed Speedfan to monitor the CPU temperature. I had set the alarm temperature in the BIOS to 60C. I noted that Speedfan seemed to be reporting a temperature of 80C which was a little alarming. I left it encoding for a while, and came back to find Speedfan's graphs showing a temperature under load of more than 100C had been recorded. However, no alarms were going off, and the system seemed find. So I ran another encoding task. This time when I returned, however, the system was dead again. Exactly the same symptoms as the first time. Dead power supply, brief fan spin up. Oh, fuck.
I had had the PSU for less than 30 days, so I got straight on to ebuyer and reported it had failed. They asked me to return it to them, and it was picked up on the following Monday morning. I also went back to Gigabyte and reported a further failure with the board. I have to say at this stage that I had no idea what the problem was. I asked Gigabyte to carry out more detailed burn in checks with the board. I sent it back to them the same Monday.
My concern at this point was that the CPU has been fundamentally damaged by the original overclock - and that to the point where it was killing other components. Gigabyte actually asked me to send them the CPU but said they could take no responsibility for its safety. On balance I wasn't prepared to risk it - it could still be the board after all.
I spent some time researching the operating temperatures of the i5 750 and found out that 80C and 100C were way beyond what it should have been running at. My suspicions turned to the cooling system. I was using the reference intel heat sync and fan that had come with the chip. It uses this plastic push pin system to attach it to the motherboard. It struck me as badly designed and flimsy when I was installing it, but what do I know about heat sync design. I formed the view that this was the problem and needed replaced asap. The biggest and baddest heat sync and fan for the i5 750 is the Titan Fenrir. This is a frankly ludicrous 120mm fan and heat sync. So I ordered one while the board and PSU were away.
Both ebuyer.com and Gigabyte technical support had the components back in my hands by the Friday, which I do consider to be excellent service. In particular Gigabyte sent me photographs of the board being thoroughly tested and remaining stable.
I got all the components back and reassembled the machine with the Titan Fenrir. I was extremely apprehensive but fired it up. It happily loaded windows, and I checked the temperatures asap. 25C. Not 80C - 25C. The new fan had made a significant difference. Since then I have had no further failures.
So what was the actual problem with this? I put it down to the stupid Intel Cooler design. It is too easy not to get a decent fit to the motherboard. The Titan Fenrir, by contrast, has a backing plate and bolts, meaning that when it is fixed, you know it is fixed.
There is another possibility though. Remember the memory I got was rated to run at 1600Mhz? Well, the bus speed of the i5 750 is 133Mhz. The memory runs at 10x the bus speed. So how does the 1600Mhz work? It uses a system called XMP - which has a particular profile built into the memory chip which the BIOS on the motherboard can read. I had activated this (before each failure) without thinking too much about it. I looked more closely at it after the second failure. It turns out that what it does is raise the CPU bus speed to 160Mhz which then allows the memory to run at 1600Mhz. This means that if you then further over clock the chip you are going way beyond the original settings. This meant that when I did the first, modest over clock, I was actually stressing the system more that I had thought. This time around I have not activated the XMP. So far, so good.
Lessons learned? Intel heat syncs and fans are crap on the i5 750. XMP memory profiles may not be good.
Oh, and my i5 chip must be made out of asbestos. It's max temperature is 72C. It went way beyond that to the point where the power draw was enough to (presumably) fry the motherboard (twice) and 2 power supplys. At no point did it shutdown to protect itself - or the other components.
Finally it turned out my case did not have a speaker, so the BIOS was probably beeping away its warnings to no avail because no speaker was attached to the jumper. I have now attached a small stand alone speaker which should mean I get the warnings in the future.
Wednesday, 31 March 2010

Friday, 22 January 2010
Command Line Compression
In Microsoft centric operating systems compressing files is reasonable straightforwards. The software used is fairly mature, and the task is usually as simple as right clicking on a folder or file and choosing the relevant compression task from the context menu. You then end up with a file containing your compressed data, with a file extension that tells you what the compression type is (.rar, .zip, .7z, etc etc).
Perhaps unsurprisingly by now, Linux is a little more complicated. You will usually encounter a compressed file you want to uncompress before you find the need to start compressing your own data. You will probably download this file. It's name will be something like:
A tar file is, as far as I can gather, a file created using the tar command which contains other files. There is something deeply unsatisfying about that explanation, but it is the best I have. For our present purpose, it is also the only explanation you need. To unpack a tar file you run the following command in the directory where the tar file is:
The 'x' means e[x]tract, and the 'f' means the [f]ile name follows immediately. That won't work for our files though, because they are not just tarred, they are feathered as well. Sorry, not feathered, compressed. The last section of the extension tells you about the type of compression used. If it says .gz that means it has been zipped. If it says bz2, it has been bzipped with version 2 of that software. Generally speaking bz2 files are smaller than the equivalent gz file, take less time to download and take up less space. Why ALL files are not compressed using bzip2 I have no idea. It is bizarre. Anyway, to uncompress at the same time as unpacking from the 'tar' file, you add 'g' for a gz file and 'b' for a bz2 file. Its obviously isn't it? No, sorry it is 'z' for a gz file (which makes sense … just) and for bz2, 'j' for some unfathomable reason. So:
You may want to throw in a 'v' for [v]erify into the command which will print the name of each file it extracts. This way you can check the system is actually doing something and has not crashed. The command ends up as:
Which is clear as mud to some one who just wants to open a compressed file.
Perhaps unsurprisingly by now, Linux is a little more complicated. You will usually encounter a compressed file you want to uncompress before you find the need to start compressing your own data. You will probably download this file. It's name will be something like:
[name of archive].tar.bz2So what is going on here then? Well in Linux first you have a bunch of files which you 'tar' and then compress. Or, the other way around, first you have a compressed file which you uncompress, then un-'tar' into your bunch of files.
or
[name of archive].tar.gz
A tar file is, as far as I can gather, a file created using the tar command which contains other files. There is something deeply unsatisfying about that explanation, but it is the best I have. For our present purpose, it is also the only explanation you need. To unpack a tar file you run the following command in the directory where the tar file is:
tar -xf [name of tar file]
The 'x' means e[x]tract, and the 'f' means the [f]ile name follows immediately. That won't work for our files though, because they are not just tarred, they are feathered as well. Sorry, not feathered, compressed. The last section of the extension tells you about the type of compression used. If it says .gz that means it has been zipped. If it says bz2, it has been bzipped with version 2 of that software. Generally speaking bz2 files are smaller than the equivalent gz file, take less time to download and take up less space. Why ALL files are not compressed using bzip2 I have no idea. It is bizarre. Anyway, to uncompress at the same time as unpacking from the 'tar' file, you add 'g' for a gz file and 'b' for a bz2 file. Its obviously isn't it? No, sorry it is 'z' for a gz file (which makes sense … just) and for bz2, 'j' for some unfathomable reason. So:
tar -zxf [name of tar].gz
tar -jxf [name of tar].bz2
You may want to throw in a 'v' for [v]erify into the command which will print the name of each file it extracts. This way you can check the system is actually doing something and has not crashed. The command ends up as:
tar -zxvf [name of tar].gzNow, when it comes to compressing your files, it is just a matter of tweaking the command. You use 'c' for 'c'reate instead of 'x' for e'x'tract. Other than that, after the name of the archive you want to compress into, you list the filenames or directories you want to add. Hence:
tar -jxvf [name of tar].bz2
tar -zcvf [name of archive].tar.gz [list of files or folders to compress and add]All in all, not as painful as it first appears. Having said that, I had to go through a lot of logical deduction to work out all of the above. As I have discovered previously the actual manual page for the tar command is strong stuff. The opening paragraph, for instance, is:
tar -jcvf [name of archive].tar.bz2 [list of files or folders to compress and add]
     The first argument to should be a function; either one of the letters
     Acdrtux, or one of the long function names.  A function letter need not
     be prefixed with ``-'', and may be combined with other single-letter
     options.  A long function name must be prefixed with --.  Some options
     take a parameter; with the single-letter form these must be given as sep‐
     arate arguments.  With the long form, they may be given by appending
     =value to the option.
Which is clear as mud to some one who just wants to open a compressed file.
Friday, 15 January 2010
Network Disconnection
Right. So you are using ubuntu and your get heartily pissed off with Network Manager, so you switch to Wicd. All fun and games until you try to assign a manual IP address and then go back to DHCP. Then, for reasons which I will set out below, evolution starts prompting you for your password constantly. The internet works, but you cannot browse your local network shares.
Oh joy.
Now, this type of problem screams DNS error. You can test this by alternately pinging the IP address of your server, and then the Name of your server. If the former works but not the latter you have a DNS lookup problem.
It turns out that when Wicd gets a hold of the DNS settings for Ubuntu it fubars them and doesn't put them back the way they ought to be. In ubuntu the DNS settings are stored in the file:
Oh joy.
Now, this type of problem screams DNS error. You can test this by alternately pinging the IP address of your server, and then the Name of your server. If the former works but not the latter you have a DNS lookup problem.
It turns out that when Wicd gets a hold of the DNS settings for Ubuntu it fubars them and doesn't put them back the way they ought to be. In ubuntu the DNS settings are stored in the file:
/etc/resolv.confIn order to work properly this needs to have the following lines above the nameserver line comme ca:
domain mylocaldomain.local
search mylocaldomain.local
nameserver [IP of DNS server]
Wednesday, 16 December 2009
Karmic Sound
The Intel ICH7 southbridge with AC'97 audio is hardly what I would call rare. And yet, somehow Ubuntu Karmic conspires to screw around with the audio settings for this device.
Apparently, the only sure fire way to get sounds from the integrated speaker is to inadvertently browse to a website with garish embedded sound. If you actually want sound to emanate from the speaker though, you are stuffed.
Y'see there are settings and there are settings. The Sound Preferences program (which is run by the command gnome-sound-control, which in turns runs a program with the name gnome-volume-manager) has no setting for changing the source for the external speaker. So if it gets stuck on "Mic" you get no sound at all. You then have to drop to a terminal and run:
To get to the setting for "Mono Out". You want to use Page Up and Page Down to change between Mic and Mix. Mix being the one you want.
There is of course a separate question of who in their right mind would want to direct the Mic input straight to the Mono Speaker output. A nutter is the answer to that question.
BUT WAIT!
Not content with one way to screw up your day, Ubuntu is ready with yet another. Pulseaudio is a part of Ubuntu that does ... I have no idea what. Pisses me off I suppose.
When this little gem swings into action (which appears from my extensive research to be whenever it fucking feels like it), the aforementioned Sound Preferences Program declares that you have NO OUTPUTS for sound. Alsamixer, gnome-alsamixer, and kmix can all happily see the proper sound outputs, but can you get any sound? No.
So, what you can do then is run:
from a terminal. That looks fairly nightmarish, so lets break it down. 'ps' means show me details of running processes. 'aux' is just a series of settings which make 'ps' show you a information about as many processes as possible. The '|' symbol means take the output of the left hand side of the line and 'pipe' it to the command on the right hand side of the line. The command 'grep' means search for, and the 'pulseaudio' is what we are searching for.
So, the command as a whole searches all running processes for pulseaudio and reports back information on it. The key piece of information you need is the 'pid' or program ID. This should be a 4 digit number. It uniquely identifies the program on the machine. The next step is the satisfying:
That should terminate pulseaudio, so when you go back to Sound Preferences, your output devices are back!
Apparently, the only sure fire way to get sounds from the integrated speaker is to inadvertently browse to a website with garish embedded sound. If you actually want sound to emanate from the speaker though, you are stuffed.
Y'see there are settings and there are settings. The Sound Preferences program (which is run by the command gnome-sound-control, which in turns runs a program with the name gnome-volume-manager) has no setting for changing the source for the external speaker. So if it gets stuck on "Mic" you get no sound at all. You then have to drop to a terminal and run:
alsamixer
To get to the setting for "Mono Out". You want to use Page Up and Page Down to change between Mic and Mix. Mix being the one you want.
There is of course a separate question of who in their right mind would want to direct the Mic input straight to the Mono Speaker output. A nutter is the answer to that question.
BUT WAIT!
Not content with one way to screw up your day, Ubuntu is ready with yet another. Pulseaudio is a part of Ubuntu that does ... I have no idea what. Pisses me off I suppose.
When this little gem swings into action (which appears from my extensive research to be whenever it fucking feels like it), the aforementioned Sound Preferences Program declares that you have NO OUTPUTS for sound. Alsamixer, gnome-alsamixer, and kmix can all happily see the proper sound outputs, but can you get any sound? No.
So, what you can do then is run:
ps aux | grep pulseaudio
from a terminal. That looks fairly nightmarish, so lets break it down. 'ps' means show me details of running processes. 'aux' is just a series of settings which make 'ps' show you a information about as many processes as possible. The '|' symbol means take the output of the left hand side of the line and 'pipe' it to the command on the right hand side of the line. The command 'grep' means search for, and the 'pulseaudio' is what we are searching for.
So, the command as a whole searches all running processes for pulseaudio and reports back information on it. The key piece of information you need is the 'pid' or program ID. This should be a 4 digit number. It uniquely identifies the program on the machine. The next step is the satisfying:
kill [pid of pusleaudio you found in the last step], e.g.
kill 1234
That should terminate pulseaudio, so when you go back to Sound Preferences, your output devices are back!
Friday, 23 October 2009
get_iplayer
get_iplayer is a very useful command line utility to download, perfectly legally, programs from the BBC's iplayer facility.
Ordinarily, you can download the programs using iplayer's built in p2p system. This may or may not be attractive for you. It is useless if the program you are interested in is not available for download in a format you want for example. The alternative is watching the programs in the website's flash player. This is great, unless your ISP comprises a greater number of arseholes than a proctologist's final year exams. If so, you are likely to find your ISP bandwidth throttles real time video. You can find out if your ISP is doing this here.
If you suffer from this problem, then get_iplayer could be the solution. There are various packages for distributions etc etc available on the website, and it even works in windows. To install it from scratch though, use the following commands from your home folder, or where ever:
The software will now be installed, with the important flvstreamer addon. Download the iplayer database by running this command from the isntall folder:
You can configure default options by running these commands:
By way of example, you can now download a clip embedded in a BBC webpage by running this command:
You can download live F1, and presumably other sports, with a little more effort. First, install the Firebug add-on for firefox. Now, activate the add-on and browse to the live website. Use the “All Panels” option from the bug icon in the lower right corner of Firefox. Then, left click the bug to bring up the information, select the 'Net' tab, and look for a connection like this:
Ordinarily, you can download the programs using iplayer's built in p2p system. This may or may not be attractive for you. It is useless if the program you are interested in is not available for download in a format you want for example. The alternative is watching the programs in the website's flash player. This is great, unless your ISP comprises a greater number of arseholes than a proctologist's final year exams. If so, you are likely to find your ISP bandwidth throttles real time video. You can find out if your ISP is doing this here.
If you suffer from this problem, then get_iplayer could be the solution. There are various packages for distributions etc etc available on the website, and it even works in windows. To install it from scratch though, use the following commands from your home folder, or where ever:
wget http://linuxcentre.net/get_iplayer/packages/get_iplayer-current.tar.gz
tar -xzvf get_iplayer-current.tar.gz
cd get_iplayer*
wget http://download.savannah.gnu.org/releases-noredirect/flvstreamer/source/flvstreamer-1.8k.tar.gz
tar -xzvf flvstreamer-1.8k.tar.gz
cd flvstreamer
make flvstreamer
make streams
cd ..
The software will now be installed, with the important flvstreamer addon. Download the iplayer database by running this command from the isntall folder:
./get_player
You can configure default options by running these commands:
./get_iplayer --prefs-add --modes=flashhd,flashvhigh,flashhigh,flashnormal,iphoneYou can check and remove these default options by running:
./get_iplayer --prefs-add --flvstreamer "./flvstreamer/flvstreamer_x86"
./get_iplayer --prefs-show
./get_iplayer --prefs-clear
By way of example, you can now download a clip embedded in a BBC webpage by running this command:
./get_iplayer --url="http://news.bbc.co.uk/sport1/hi/motorsport/formula_one/8304965.stm"
You can download live F1, and presumably other sports, with a little more effort. First, install the Firebug add-on for firefox. Now, activate the add-on and browse to the live website. Use the “All Panels” option from the bug icon in the lower right corner of Firefox. Then, left click the bug to bring up the information, select the 'Net' tab, and look for a connection like this:
http://www.bbc.co.uk/mediaselector/4/gtis/?server=cp52115.live.edgefcs.net&identifier=sport6a_hq@s5444&kind=akamai&application=live&cb=59251Copy that URL, and paste it into the command above as the text between the quotes.
Tuesday, 22 September 2009
Linux Basics - Rename Files
Oh god this was depressing. Say you have a bunch of .jpeg files you want to make into .jpg files. A filemanager on its own is pretty useless for this in either windows or linux. You may now decide to use a bulk rename utility. If you do this, you will be immediately sent in-fucking-sane by a user interface looking like this.
The second option, if you wish to preserve your grip on reality, is to use the command line. In windows the command to rename all .jpeg files to .jpg looks like this:
Oh, and another thing. Apparently the usual way to rename files in Linux is to [m]o[v]e them like this:
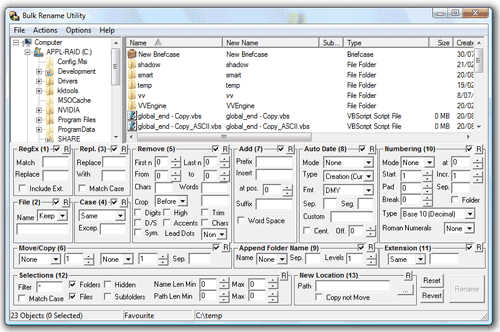
The second option, if you wish to preserve your grip on reality, is to use the command line. In windows the command to rename all .jpeg files to .jpg looks like this:
rename *.jpeg *.jpgThe '*' is a wildcard standing for any filename. So far, so good. The linux version of the command looks like this:
rename -v 's/\.jpeg$/\.jpg/' *.jpegI will accept that this is less mind meltingly unintuitive then the hideous UI cited above, but it is a close run thing.
Oh, and another thing. Apparently the usual way to rename files in Linux is to [m]o[v]e them like this:
mv oldfilename newfilenameIf you realise that [c]o[p]y is cp, [m]o[v]e is mv, then you may think that [r]ena[m]e is rm. That would be a bad thing, because rm is actually [r]e[m]ove. Apparently no-one thinks this is all utterly bizarre.
Linux Basics - Download and Run Files
In general most advanced distributions of Linux are far more sensible about software installation than windows. Instead of having programs scattered far and wide across the interweb, they are usually collected together in a collection, or repository of files.
Sometime software will depend to some extent on other pieces of software. In windows this can manifest itself in the need for visual basic runtimes, or .net installations. You download a useful looking bit of software, install it, and run it only to find you need to download a FURTHER application 10 times the size just to get the sod to work.
No difference in Linux, except, as I say with more advanced distributions. What is important about the repositories is that not only is all the software in the same place BUT each bit of software knows what OTHER bits of software from the same repository it needs to run. So when you install the software it automatically downloads and installs all the other software it needs to function.
However, sometimes you do want to install some software from outside the standard repositories. If you try to do this in the windows way (right click link, save to disk, double click resulting icon, you are fucked. But it will not tell you what has gone wrong.
What you need to do is tell Linux it can run, or execute the program you have just downloaded. You can do this using most file managers by right clicking, looking for 'permissions'. There should then be an option, probably a checkbox, to turn on the 'execute' permission for the file. Alternatively you can do this on the command line by running the command:
Sometime software will depend to some extent on other pieces of software. In windows this can manifest itself in the need for visual basic runtimes, or .net installations. You download a useful looking bit of software, install it, and run it only to find you need to download a FURTHER application 10 times the size just to get the sod to work.
No difference in Linux, except, as I say with more advanced distributions. What is important about the repositories is that not only is all the software in the same place BUT each bit of software knows what OTHER bits of software from the same repository it needs to run. So when you install the software it automatically downloads and installs all the other software it needs to function.
However, sometimes you do want to install some software from outside the standard repositories. If you try to do this in the windows way (right click link, save to disk, double click resulting icon, you are fucked. But it will not tell you what has gone wrong.
What you need to do is tell Linux it can run, or execute the program you have just downloaded. You can do this using most file managers by right clicking, looking for 'permissions'. There should then be an option, probably a checkbox, to turn on the 'execute' permission for the file. Alternatively you can do this on the command line by running the command:
chmod +x /path/to/nameoffileThis [ch]anges the [mod]e of the file [nameoffile] in the directory [/path/to] by [+]adding the e[x]ecute permission, but only for the current user. This means that if you have any other user accounts on the system, they will not be able to execute the file, which may be fine by you. To allow [a]ll users to execute the file, put an 'a' before the '+' sign, so it looks like this:
chmod a+x /path/to/nameoffileBy way of example, here is how you download and install Adobe's 'air' application:
wget http://airdownload.adobe.com/air/lin/download/1.5/AdobeAIRInstaller.binYou can just copy and paste all three of those commands into a terminal window and it will install. You do not need to open your browser. The first command goes to a file on the [w]eb and [get]s it for you. It downloads the file to the directory you run the command from. We should now know what the second command does. The third command executes the file from [./] the current directory.
chmod +x AdobeAIRInstaller.bin
./AdobeAIRInstaller.bin
Subscribe to:
Posts (Atom)