mke2fs -jv -L lfs /dev/sda?
mkdir /media/lfs
mount /dev/sda7 /media/lfs
cd /media/amiga
sudo cp -axv . /media/lfs
sudo chroot "/media/lfs" /usr/bin/env -i HOME=/root TERM="$TERM" PS1='\u:\w\$ ' PATH=/bin:/usr/bin:/sbin:/usr/sbin CORES_TO_USE=-j2 /bin/bash --login
grub --batch < /etc/grub.conf
OR
sudo mkdir /media/root
sudo mount -t ext3 /dev/sda? /media/root
sudo mount -t proc none /media/root/proc
sudo mount -o bind /dev /media/root/dev
sudo chroot /media/root /bin/bash
sudo grub
find /boot/grub/stage1
root (hd0,Y)
setup (hd0)
Showing posts with label linux. Show all posts
Showing posts with label linux. Show all posts
Friday, 17 December 2010

Tuesday, 30 November 2010
Backing up Entire Drives with [dd]
If you want to backup a partition use, [partimage]. It is excellent, and will happily achieve the task.
If, on the other hand, you want to backup the whole disk, there does not seem to me to be an OS alternative other than [dd].
To backup the [i]nput [f]ile (because in linux EVERYTHING is a file) [dev]ice [sda] in chunks with a [s]ize of 1 [M]ega[b]yte, [|] piping all data to the [bzip2] program set at the highest encryption setting [-9] to [>] the file [disk_image.301110.img.bz2] on the share [backup/reception] on the cifs server [readynasduo.local] from a live [ubuntu] user's account (having first browsed to the CIFS share, run this command:
If, on the other hand, you want to backup the whole disk, there does not seem to me to be an OS alternative other than [dd].
To backup the [i]nput [f]ile (because in linux EVERYTHING is a file) [dev]ice [sda] in chunks with a [s]ize of 1 [M]ega[b]yte, [|] piping all data to the [bzip2] program set at the highest encryption setting [-9] to [>] the file [disk_image.301110.img.bz2] on the share [backup/reception] on the cifs server [readynasduo.local] from a live [ubuntu] user's account (having first browsed to the CIFS share, run this command:
sudo dd if=/dev/sda bs=1M | bzip2 -9 >'/home/ubuntu/.gvfs/backup on readynasduo.local/reception/disk_image.301110.img.bz2'
Friday, 8 October 2010
System Info from the Command Line
Bizarrely it can be a frustrating experience to get sensible information about your system from a linux machine. Fortunately, this has been sorted out in the latest versions of Ubuntu which come with the [name of app] which seems to give one a full overview of the hardware installed in the system. Ubuntu's DIsk Usage Analyser is a very useful way of finding out what is taking up space in the system.
Those graphical applications are dependency heavy though, and require you to have the whole of Gnome installed before they are prepared to work. I therefore present herein a non-exhaustive list of commands which get you to the same kind of useful information:
This gives you the total [d]isk space used and [f]ree in [h]uman readable numbers.
This gives you the same information in marketing megabytes, not actual megabytes.
Gives you the [d]isk [u]sage of a directory and all its subdirectories individually.
Gives you the [d]isk [u]sage of the whole directory in one number.
This is a useful command to run from the root directory as it lists the space used by all subfolders to that directory only. It does not go below the subfolder level ([max-depth=1]). It does not work with [-h] as the sort ([| sort -n -r]) gets confused and does not deal with the M or K distinction. In other words a 20000k file is treated as larger than a 20m file. The excludes are useful because proc and dev are virtual and do not take up any space on the disk. I had tmp mounted to a ramdisk when I was doing my Amiga project, so I also wanted to exclude that.
This following does seem to do the sort better (or at all):
I have no idea what the [cut] or [args] bits do, but they seem to sort out (ha ha) the sorting problem.
To get Battery information from the command line, you use the following two commands:
The variable here is the [BAT1] bit. Yours may be BAT0 or something else. Just check the contents of the directory and you should find something. There is a useful perl script here which extracts and displays the information produced by the preceding commands.
Those graphical applications are dependency heavy though, and require you to have the whole of Gnome installed before they are prepared to work. I therefore present herein a non-exhaustive list of commands which get you to the same kind of useful information:
df -h
This gives you the total [d]isk space used and [f]ree in [h]uman readable numbers.
df -hH
This gives you the same information in marketing megabytes, not actual megabytes.
du [dir] -h
Gives you the [d]isk [u]sage of a directory and all its subdirectories individually.
du [dir] -hs
Gives you the [d]isk [u]sage of the whole directory in one number.
top -i...brings up a fullscreen updating display of the current active processes, and general memory/swap usage.
ps -auxf | sort -nr -k 4 | head -10...should show you the top ten processes by memory usage.
free -m...shows you memory usage only in [m]egabytes.
sudo du --max-depth=1 --exclude=*dev* --exclude=*tmp* --exclude=*proc* | sort -n -r
This is a useful command to run from the root directory as it lists the space used by all subfolders to that directory only. It does not go below the subfolder level ([max-depth=1]). It does not work with [-h] as the sort ([| sort -n -r]) gets confused and does not deal with the M or K distinction. In other words a 20000k file is treated as larger than a 20m file. The excludes are useful because proc and dev are virtual and do not take up any space on the disk. I had tmp mounted to a ramdisk when I was doing my Amiga project, so I also wanted to exclude that.
This following does seem to do the sort better (or at all):
du -ks --exclude=*dev* --exclude=*tmp* --exclude=*proc* * | sort -nr | cut -f2 | xargs -d '\n' du -sh
I have no idea what the [cut] or [args] bits do, but they seem to sort out (ha ha) the sorting problem.
To get Battery information from the command line, you use the following two commands:
cat /proc/acpi/battery/BAT1/state
cat /proc/acpi/battery/BAT1/info
The variable here is the [BAT1] bit. Yours may be BAT0 or something else. Just check the contents of the directory and you should find something. There is a useful perl script here which extracts and displays the information produced by the preceding commands.
Friday, 25 June 2010
Downloading Source Code: Making an Arse of it.
I set out in my last post how to download and compile LZMA. It was, hopefully, relatively straightforwards. Now, what about when it goes wrong. I give you: compiling nano from source code.
Nano is a command line text editor. It is not OpenOffice.org. Is it easy to install? Let's see.
So far, so LZMA. Let's have a look at the README and INSTALL files. Hmm, INSTALL is not much use:
In other words they are not tailored in anyway for nano, it is just telling you about configure/make/make install.
How about README?
Well that sounds promising! Hang on though, there is another README.SVN file; what's that?
Well, lets steer well clear of that then, sounds tricky. What ever SVN is. So:
Hmm. Not sure about this. However "if" you get errors. Let's leave this for now.
Ah, no ncurses = use the --disable-color option. Right-o.
No groff (whatever that is - sounds like something you tell your kids will come and eat them unless they behave themselves) = no manpages. Don't care about documentation - on we go!
So we need to clean up to do another configure with the no colour option? Sure.
Result? It is still whining about the lack of a curses lib. Whatever that is. I have personally assembled a fucking large curses lib by now, I can tell you. Still - 'if' ... Let's make it.
Hmm. Doesn't seem to have worked - if you peer really closely you will see the following in the output:
Right, so what the fuck is makeinfo then? I installed make, presumable makeinfo is something to do with it. Why isn't it installed?
Fucking great. Gooooooooogle. Ah. Makeinfo is installed with the texinfo package. Of course it fucking is. Why not.
Let's clean up and try again.
Oh, for fuck's sake. In a word 'error'. In fact, in many words 'error error error' - just like a 1950's robot with smoke coming out of it's domed head about to go on a a rampage. Right, must be that ncurses nonsense then. Let's try and install it.
FOR FUCK'S SAKE - don't tease me - tell me WHICH FUCKING PACKAGE REFERS TO IT! *give up* *try groff instead*
SWEET JESUS - it worked! Right:
Oh, fucking hell. Back to Google, where I find, eventually, that ncurses actually installed using:
Well, clearly it is. I mean of course. The thing is that this is obviously the file that apt-get KNEW ABOUT BUT KEPT A FUCKING SECRET.
It WORKED, it actually FUCKING WORKED! Hang on let's try
YES!
Remember:
Bastards.
Nano is a command line text editor. It is not OpenOffice.org. Is it easy to install? Let's see.
mkdir build-work
cd build-work/
wget http://www.nano-editor.org/dist/v2.1/nano-2.1.10.tar.gz
tar -xzvf nano-2.1.10.tar.gz
cd nano-2.1.10
So far, so LZMA. Let's have a look at the README and INSTALL files. Hmm, INSTALL is not much use:
"These are generic installation instructions."
In other words they are not tailored in anyway for nano, it is just telling you about configure/make/make install.
How about README?
How to compile and install nano
Download the nano source code, then:
tar zxvf nano-x.y.z.tar.gz
cd nano-x.y.z
./configure
make
make install
It's that simple.
Well that sounds promising! Hang on though, there is another README.SVN file; what's that?
GNU nano is available from SVN, but building this needs a bit more care
than the official stable and unstable tarballs.
Well, lets steer well clear of that then, sounds tricky. What ever SVN is. So:
./configure
configure: WARNING:
*** No curses lib available.  Consider getting the official ncurses
*** distribution from ftp://ftp.gnu.org/pub/gnu/ncurses if you get
*** errors compiling nano.
Hmm. Not sure about this. However "if" you get errors. Let's leave this for now.
configure: WARNING: *** Couldn't successfully compile basic color test with or without _XOPEN_SOURCE_EXTENDED
configure: WARNING: *** This build may not compile. Consider configuring with --disable-color or installing ncurses
Ah, no ncurses = use the --disable-color option. Right-o.
checking for HTML support in groff... groff: can't find `DESC' file
groff:fatal error: invalid device `html' (try installing the `groff' package?)
no
*** Will not generate HTML version of man pages  ***
*** Consider installing a newer version of groff with HTML support ***
No groff (whatever that is - sounds like something you tell your kids will come and eat them unless they behave themselves) = no manpages. Don't care about documentation - on we go!
So we need to clean up to do another configure with the no colour option? Sure.
make clean
./configure --disable-color
Result? It is still whining about the lack of a curses lib. Whatever that is. I have personally assembled a fucking large curses lib by now, I can tell you. Still - 'if' ... Let's make it.
make
Hmm. Doesn't seem to have worked - if you peer really closely you will see the following in the output:
makeinfo --no-split --html <> nano.html
/bin/bash: makeinfo: command not found
Right, so what the fuck is makeinfo then? I installed make, presumable makeinfo is something to do with it. Why isn't it installed?
sudo apt-get install makeinfo
E: Couldn't find package makeinfo
Fucking great. Gooooooooogle. Ah. Makeinfo is installed with the texinfo package. Of course it fucking is. Why not.
sudo apt-get install texinfo
Let's clean up and try again.
make clean
./configure --disable-color
make
Oh, for fuck's sake. In a word 'error'. In fact, in many words 'error error error' - just like a 1950's robot with smoke coming out of it's domed head about to go on a a rampage. Right, must be that ncurses nonsense then. Let's try and install it.
sudo apt-get install ncurses
Package ncurses is not available, but is referred to by another package.
This may mean that the package is missing, has been obsoleted, or
is only available from another source
E: Package ncurses has no installation candidate
FOR FUCK'S SAKE - don't tease me - tell me WHICH FUCKING PACKAGE REFERS TO IT! *give up* *try groff instead*
sudo apt-get install groff
SWEET JESUS - it worked! Right:
make clean
./configure --disable-color
make
Oh, fucking hell. Back to Google, where I find, eventually, that ncurses actually installed using:
sudo apt-get install libncurses5-dev
Well, clearly it is. I mean of course. The thing is that this is obviously the file that apt-get KNEW ABOUT BUT KEPT A FUCKING SECRET.
make clean
./configure --disable-color
make
It WORKED, it actually FUCKING WORKED! Hang on let's try
./src/nano
YES!
Remember:
It's that simple.
Bastards.
Friday, 18 June 2010
Downloading Source Code - 'Making' it work. Ha.
OK, you have now downloaded your source code. You have worked out that you need to COMPILE the source code to get it to run. You do this by running the 'make' command. All good. So how exactly do you do this again?
OK, I am going to use the LZMA-Utils package as an example. This is a bunch of utilities which use LZMA compression.
So, make yourself some space to work in (ALL of this is going to be command line):
Now, look at the extension to the filename '.tar.gz'. We know that means we have to run:
For the purposes of this little demonstration, we are not going to actually install the software, because that would be stupid as it would probably break your installation of Linux. If we were going to install the software, we would want to make sure that we specified an install path when we ran the configure script. This option will vary from package to package; you should check the INSTALL or README file in the working directory. If there is no such file, it means the author of the source code is a moron. In this case the option is:
You normally set other options in the same way - you can get a list of options by using the option:
So lets run the script.
What would be helpful is if it could tell you how to get the software. That is actually really easy. In ubuntu just run:
dpkg-dev: This is a list of packages which are essential. Yes, this is getting recursive. It's not really compiler stuff, but compression software, the patch command and the perl computer language. You probably have most of this installed anyway, but by telling the computer to install this package, it makes absolutely sure you have everything on the list.
g++: This is really the meat and potatoes of the compilation software. This package includes the Gnu C Complier - the 'gcc' in the error message above, as well as come ancillary software.
libc6-dev: this is a bunch of support files for the C language.
make: Go on, just guess what this package contains.
After your installation, try the configure command again.
You should see a stream of messages coming up which I am not going to copy here, but for the sake of comparison with the above here is the first few:
OK, I am going to use the LZMA-Utils package as an example. This is a bunch of utilities which use LZMA compression.
So, make yourself some space to work in (ALL of this is going to be command line):
mkdir ~/build-work
cd ~/build-work
wget http://tukaani.org/lzma/lzma-4.32.7.tar.gz
Now, look at the extension to the filename '.tar.gz'. We know that means we have to run:
tar -xzvf lzma-4.32.7.tar.gzto uncompress the file. Now change to the directory you just created:
cd lzma-4.32.7Now comes the fun part. You may want to set some configuration options in your program. You may want a video encoder to use specific codecs, or to install the program to a certain location, or to use a certain language, or only to install certain parts of itself. You usually achieve all these goals with the 'configure' command. This is actually a script which comes with the program which sets it all up for you. If there is no configure script that usually means that the program is utterly basic (which may be a good thing) with no options.
For the purposes of this little demonstration, we are not going to actually install the software, because that would be stupid as it would probably break your installation of Linux. If we were going to install the software, we would want to make sure that we specified an install path when we ran the configure script. This option will vary from package to package; you should check the INSTALL or README file in the working directory. If there is no such file, it means the author of the source code is a moron. In this case the option is:
--prefix=/usrto make it install to the /usr folder. PLEASE NOTE this does not actually install the software here when you run 'make' - it just configures the scripts with an install location. You still need to run a separate command to actually perform the install in due course.
You normally set other options in the same way - you can get a list of options by using the option:
--help
So lets run the script.
configure
configure: command not foundOh, for fucks sa... oops
./configure
checking if debugging code should be compiled... noAgain, some brilliant communication by way of error messages here. What the script is trying to tell us is that it has run a series of checks to make sure that the computer it is running on is capable of actually compiling the software. It is checking for special software which the 'make' command uses to load the human readable source code and convert it (or compile it) into computer readable code that can be run. It has come to the conclusion that that software does not work, or is missing.
checking for a BSD-compatible install... /usr/bin/install -c
checking whether build environment is sane... yes
checking for a thread-safe mkdir -p... /bin/mkdir -p
checking for gawk... gawk
checking whether make sets $(MAKE)... no
checking for g++... no
checking for c++... no
checking for gpp... no
checking for aCC... no
checking for CC... no
checking for cxx... no
checking for cc++... no
checking for cl.exe... no
checking for FCC... no
checking for KCC... no
checking for RCC... no
checking for xlC_r... no
checking for xlC... no
checking for C++ compiler default output file name...
configure: error: C++ compiler cannot create executables
See `config.log' for more details.
What would be helpful is if it could tell you how to get the software. That is actually really easy. In ubuntu just run:
sudo apt-get install build-essentialto install a group of packages that handle software compilation. These include the following:
dpkg-dev: This is a list of packages which are essential. Yes, this is getting recursive. It's not really compiler stuff, but compression software, the patch command and the perl computer language. You probably have most of this installed anyway, but by telling the computer to install this package, it makes absolutely sure you have everything on the list.
g++: This is really the meat and potatoes of the compilation software. This package includes the Gnu C Complier - the 'gcc' in the error message above, as well as come ancillary software.
libc6-dev: this is a bunch of support files for the C language.
make: Go on, just guess what this package contains.
After your installation, try the configure command again.
You should see a stream of messages coming up which I am not going to copy here, but for the sake of comparison with the above here is the first few:
checking if debugging code should be compiled... noNote the 'yes' rather than 'no' answers. Everything should be fine, so run:
checking for a BSD-compatible install... /usr/bin/install -c
checking whether build environment is sane... yes
checking for a thread-safe mkdir -p... /bin/mkdir -p
checking for gawk... gawk
checking whether make sets $(MAKE)... yes
checking for g++... g++
checking for C++ compiler default output file name... a.out
checking whether the C++ compiler works... yes
maketo compile the software. This will take a few seconds or so.Once the make command has stopped, hopefully without a trail of error messages, you can run:
make checkto run some built in tests. It should tell you that:
All 2 tests passedLet's draw a veil over the appalling use of grammar. To actually run your newly compiled software you can run:
./src/lzma/lzma -Vwhich should return the message:
LZMA command line tool 4.32.7If so, congratulations, you have built software from source code. To install the software - DO NOT DO THIS NOW - you would run:
LZMA SDK 4.32
make installYou will get an error about running this unless you are root, so you would run:
sudo make installinstead. This just copies the files that were created in the 'make' step to the appropriate places in the file system. Once that has finished you can delete the working folder, and you are done!
Tuesday, 15 June 2010
Downloading Source Code - How'd you run the File?
So, you have managed to download some source code. What on earth do you do with it next? Well, if you do what I first did, you end up with a file and you want to run it. Having experience only of Windows to that point, I double clicked the file that I had downloaded. That only opened a folder with no files in it that appeared to be executable. Hmm.
OK, so doing some sensible checks through Google I discover that I have to turn on a file's executable flag before being able to run it. Right, sounds a bit like adding .exe to the end of the filename, not too onerous. Lets have a go at thi... Wait a fucking minute, what the fuck is chmod 0755? What on earth does that do? After another age of research (bear in mind I am just trying to execute a fucking file) I discover that linux has a whole series of file permissions. They can each be on or off. So what you end up with is a string of '1's or '0's to indicate the state of various permissions. In other words it is a binary number. When you convert the binary number to decimal you end up with something as intuitively obvious as 0755. Fucking spiffing. If I wanted to work in binary I would grow another 38 fucking legs and call myself an 8086 central processing unit.
Thankfully, there is a far more sensible alternative to that command. You can simply ask the system to:
This [ch]anges the [mod]e of the [filename] to allow it to be e[x]ecuted. You can now try and run the file by double clicking the file. AAAAAAND nothing happens. OK, so lets drop to a command line, and change into the directory the file is in. Now type in the name of the file, AAAAAAND
At this point I have to say I gave up. Several years later in my experience with Linux I found out that as with microsoft operating systems there is a PATH variable which contains a list of locations in the filesystem in which there are executable files. When the system reports "command not found", it actually means that the file has not been found in any of the directories listed in the PATH variable. The genius part of all this is that Linux DOES NOT HAVE YOUR CURRENT FOLDER IN THE PATH. That means that even if you can see the file you want to run you can't. What you need to do is to type in:
before the name of the file which tells the system that you want to run a file which is in the same directory. OK, so lets do that.
Find out the joys of trying to compile files next time.
OK, so doing some sensible checks through Google I discover that I have to turn on a file's executable flag before being able to run it. Right, sounds a bit like adding .exe to the end of the filename, not too onerous. Lets have a go at thi... Wait a fucking minute, what the fuck is chmod 0755? What on earth does that do? After another age of research (bear in mind I am just trying to execute a fucking file) I discover that linux has a whole series of file permissions. They can each be on or off. So what you end up with is a string of '1's or '0's to indicate the state of various permissions. In other words it is a binary number. When you convert the binary number to decimal you end up with something as intuitively obvious as 0755. Fucking spiffing. If I wanted to work in binary I would grow another 38 fucking legs and call myself an 8086 central processing unit.
Thankfully, there is a far more sensible alternative to that command. You can simply ask the system to:
chmod +x filename
This [ch]anges the [mod]e of the [filename] to allow it to be e[x]ecuted. You can now try and run the file by double clicking the file. AAAAAAND nothing happens. OK, so lets drop to a command line, and change into the directory the file is in. Now type in the name of the file, AAAAAAND
command not foundYes it is! I have found it! Look there it is in the fucking directory I typed the command in.
At this point I have to say I gave up. Several years later in my experience with Linux I found out that as with microsoft operating systems there is a PATH variable which contains a list of locations in the filesystem in which there are executable files. When the system reports "command not found", it actually means that the file has not been found in any of the directories listed in the PATH variable. The genius part of all this is that Linux DOES NOT HAVE YOUR CURRENT FOLDER IN THE PATH. That means that even if you can see the file you want to run you can't. What you need to do is to type in:
./
before the name of the file which tells the system that you want to run a file which is in the same directory. OK, so lets do that.
Cannot execute binary fileBrilliant. What next? After extensive research I discovered that you cannot simply run the file you have downloaded. Instead you have to 'make' it first. Which came as something of a fucking shock I can tell you - I thought the whole point was some other bugger made it and I used it? Oh, I see, to 'make' a file actually means to compile a working executable file from the source code? Well that makes sense, as long as you change the command from 'make' to 'compile'.
Find out the joys of trying to compile files next time.
Friday, 4 June 2010
Downloading Source Code - What and Why?
You know what one of the biggest pains in the arse is for a new open source user? Open source code.
Yeah, who'da thunk it?
Y'see with windows flavour operating system you download a program. You usually get an install file which you double click, progress through some questions about where you want to install the software, delete the name of the software writer in the install path so you can actually find the fucker in "Program Files" in the future, and click on install.
You then just run the software from a shortcut on the desktop or the Start Menu. Usually either the desktop or the start menu gets bloated with entries to the point where you have to buy a new computer.
Alternatively, you can download a zip file, which you just uncompress to a folder and then make your own shortcuts, and just run the program from that folder.
When you 'run' a program, what I mean is that you execute a file. This is usually a file with the extension .exe, or sometimes .com. Occasionally you run a batch file (extension .bat) which then handles the execution of the .exe file in due course.
With an advanced distribution of Linux, such as Ubuntu, you install new programs using a package management facility. What this means is that Canonical, the company behind Ubuntu, maintain a collection of software that is 'approved' to work with Ubuntu. The installation of the software is completely automated, once you have chosen it in the software store.
Ubuntu, in effect, handles the downloading, and installing of the software. You are left with a menu entry to run the software.
This is, actually, really easy. Like many things that are really easy it is also inflexible. Go on, try and reorganise your menu entries. I dare you.
So what if you want to install software that is not on Ubuntu's approved list? Well then we go from 'really easy' to mind disturbingly fucking hard.
Occasionally, just occasionally, software is provided for download in the same sense as windows install files. You get an archive containing the program files, and any support files. You install the software by double clicking the file (or by typing some ludicrously long command at the command line). The archive itself has a set of instructions built in that tells it where to install the files to, and where (or if) to make the menu entry. So far so good.
However, different distributions of Linux organise their file structures in different ways. So software may be installed in the Linux equivalent of: C:\Program Files\[location] or C:\Application Files\[location] or C:\Some Other Weird Place\[location], depending on your particular distribution. This means that one archive will not work on all distributions of Linux. Ubuntu and other Debian based distributions install archives are called .deb files. Fedora, and other Redhat based distributions use .rpm files.
You cannot use .rpm files on a system expecting .deb files and vice versa (well, OK, if you use a package converter you might be able to. Best of luck with that, let me know how the reinstall goes).
OK, so we have the Distribution approved files in their collections (known as repositories), we have a small fraction of software developers who go to the trouble of making a .deb AND a .rpm AND a .whatever file for their software. What about the other software that you may find in random places in the internet? What about the software that you download in a .tar.gz or a .tar.bz2 file? What the fuck do you do with these? And why would you want to have anything to do with them anyway?
You will eventually encounter and download these files because, while the repository system is useful, it does not have all the software that you may want, or if it does it may not be the version you want. See for instance my vocal complaint about the version of ALSA that came with Ubuntu Karmic. It needed to be upgraded to a newer version, but that version was not supported by Karmic (it is by Intrepid).
Also, some software may be so new it is simply not included in the formal repository system. Lastly, the software may be deliberately excluded from the repositories for intellectual property reasons (if all the source is not free for instance).
See next time for more exciting revelations about source code! Gasp in awe as I try in vain to run a program by making HandBrake-0.9.4.tar.bz2 an executable file and typing its name! Groan in agony as you realise that after downloading the 32k file you have also to download 100Mb of other software just to get it to work - its .net all over a-fucking-gain!
Yeah, who'da thunk it?
Y'see with windows flavour operating system you download a program. You usually get an install file which you double click, progress through some questions about where you want to install the software, delete the name of the software writer in the install path so you can actually find the fucker in "Program Files" in the future, and click on install.
You then just run the software from a shortcut on the desktop or the Start Menu. Usually either the desktop or the start menu gets bloated with entries to the point where you have to buy a new computer.
Alternatively, you can download a zip file, which you just uncompress to a folder and then make your own shortcuts, and just run the program from that folder.
When you 'run' a program, what I mean is that you execute a file. This is usually a file with the extension .exe, or sometimes .com. Occasionally you run a batch file (extension .bat) which then handles the execution of the .exe file in due course.
With an advanced distribution of Linux, such as Ubuntu, you install new programs using a package management facility. What this means is that Canonical, the company behind Ubuntu, maintain a collection of software that is 'approved' to work with Ubuntu. The installation of the software is completely automated, once you have chosen it in the software store.
Ubuntu, in effect, handles the downloading, and installing of the software. You are left with a menu entry to run the software.
This is, actually, really easy. Like many things that are really easy it is also inflexible. Go on, try and reorganise your menu entries. I dare you.
So what if you want to install software that is not on Ubuntu's approved list? Well then we go from 'really easy' to mind disturbingly fucking hard.
Occasionally, just occasionally, software is provided for download in the same sense as windows install files. You get an archive containing the program files, and any support files. You install the software by double clicking the file (or by typing some ludicrously long command at the command line). The archive itself has a set of instructions built in that tells it where to install the files to, and where (or if) to make the menu entry. So far so good.
However, different distributions of Linux organise their file structures in different ways. So software may be installed in the Linux equivalent of: C:\Program Files\[location] or C:\Application Files\[location] or C:\Some Other Weird Place\[location], depending on your particular distribution. This means that one archive will not work on all distributions of Linux. Ubuntu and other Debian based distributions install archives are called .deb files. Fedora, and other Redhat based distributions use .rpm files.
You cannot use .rpm files on a system expecting .deb files and vice versa (well, OK, if you use a package converter you might be able to. Best of luck with that, let me know how the reinstall goes).
OK, so we have the Distribution approved files in their collections (known as repositories), we have a small fraction of software developers who go to the trouble of making a .deb AND a .rpm AND a .whatever file for their software. What about the other software that you may find in random places in the internet? What about the software that you download in a .tar.gz or a .tar.bz2 file? What the fuck do you do with these? And why would you want to have anything to do with them anyway?
You will eventually encounter and download these files because, while the repository system is useful, it does not have all the software that you may want, or if it does it may not be the version you want. See for instance my vocal complaint about the version of ALSA that came with Ubuntu Karmic. It needed to be upgraded to a newer version, but that version was not supported by Karmic (it is by Intrepid).
Also, some software may be so new it is simply not included in the formal repository system. Lastly, the software may be deliberately excluded from the repositories for intellectual property reasons (if all the source is not free for instance).
See next time for more exciting revelations about source code! Gasp in awe as I try in vain to run a program by making HandBrake-0.9.4.tar.bz2 an executable file and typing its name! Groan in agony as you realise that after downloading the 32k file you have also to download 100Mb of other software just to get it to work - its .net all over a-fucking-gain!
Friday, 23 October 2009
get_iplayer
get_iplayer is a very useful command line utility to download, perfectly legally, programs from the BBC's iplayer facility.
Ordinarily, you can download the programs using iplayer's built in p2p system. This may or may not be attractive for you. It is useless if the program you are interested in is not available for download in a format you want for example. The alternative is watching the programs in the website's flash player. This is great, unless your ISP comprises a greater number of arseholes than a proctologist's final year exams. If so, you are likely to find your ISP bandwidth throttles real time video. You can find out if your ISP is doing this here.
If you suffer from this problem, then get_iplayer could be the solution. There are various packages for distributions etc etc available on the website, and it even works in windows. To install it from scratch though, use the following commands from your home folder, or where ever:
The software will now be installed, with the important flvstreamer addon. Download the iplayer database by running this command from the isntall folder:
You can configure default options by running these commands:
By way of example, you can now download a clip embedded in a BBC webpage by running this command:
You can download live F1, and presumably other sports, with a little more effort. First, install the Firebug add-on for firefox. Now, activate the add-on and browse to the live website. Use the “All Panels” option from the bug icon in the lower right corner of Firefox. Then, left click the bug to bring up the information, select the 'Net' tab, and look for a connection like this:
Ordinarily, you can download the programs using iplayer's built in p2p system. This may or may not be attractive for you. It is useless if the program you are interested in is not available for download in a format you want for example. The alternative is watching the programs in the website's flash player. This is great, unless your ISP comprises a greater number of arseholes than a proctologist's final year exams. If so, you are likely to find your ISP bandwidth throttles real time video. You can find out if your ISP is doing this here.
If you suffer from this problem, then get_iplayer could be the solution. There are various packages for distributions etc etc available on the website, and it even works in windows. To install it from scratch though, use the following commands from your home folder, or where ever:
wget http://linuxcentre.net/get_iplayer/packages/get_iplayer-current.tar.gz
tar -xzvf get_iplayer-current.tar.gz
cd get_iplayer*
wget http://download.savannah.gnu.org/releases-noredirect/flvstreamer/source/flvstreamer-1.8k.tar.gz
tar -xzvf flvstreamer-1.8k.tar.gz
cd flvstreamer
make flvstreamer
make streams
cd ..
The software will now be installed, with the important flvstreamer addon. Download the iplayer database by running this command from the isntall folder:
./get_player
You can configure default options by running these commands:
./get_iplayer --prefs-add --modes=flashhd,flashvhigh,flashhigh,flashnormal,iphoneYou can check and remove these default options by running:
./get_iplayer --prefs-add --flvstreamer "./flvstreamer/flvstreamer_x86"
./get_iplayer --prefs-show
./get_iplayer --prefs-clear
By way of example, you can now download a clip embedded in a BBC webpage by running this command:
./get_iplayer --url="http://news.bbc.co.uk/sport1/hi/motorsport/formula_one/8304965.stm"
You can download live F1, and presumably other sports, with a little more effort. First, install the Firebug add-on for firefox. Now, activate the add-on and browse to the live website. Use the “All Panels” option from the bug icon in the lower right corner of Firefox. Then, left click the bug to bring up the information, select the 'Net' tab, and look for a connection like this:
http://www.bbc.co.uk/mediaselector/4/gtis/?server=cp52115.live.edgefcs.net&identifier=sport6a_hq@s5444&kind=akamai&application=live&cb=59251Copy that URL, and paste it into the command above as the text between the quotes.
Tuesday, 22 September 2009
Linux Basics - Rename Files
Oh god this was depressing. Say you have a bunch of .jpeg files you want to make into .jpg files. A filemanager on its own is pretty useless for this in either windows or linux. You may now decide to use a bulk rename utility. If you do this, you will be immediately sent in-fucking-sane by a user interface looking like this.
The second option, if you wish to preserve your grip on reality, is to use the command line. In windows the command to rename all .jpeg files to .jpg looks like this:
Oh, and another thing. Apparently the usual way to rename files in Linux is to [m]o[v]e them like this:
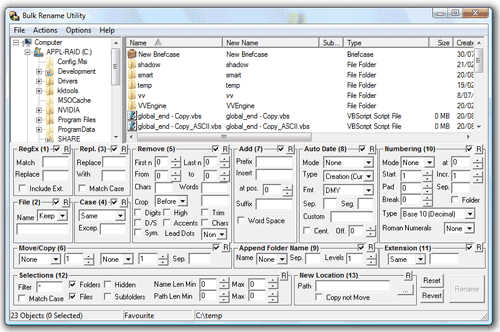
The second option, if you wish to preserve your grip on reality, is to use the command line. In windows the command to rename all .jpeg files to .jpg looks like this:
rename *.jpeg *.jpgThe '*' is a wildcard standing for any filename. So far, so good. The linux version of the command looks like this:
rename -v 's/\.jpeg$/\.jpg/' *.jpegI will accept that this is less mind meltingly unintuitive then the hideous UI cited above, but it is a close run thing.
Oh, and another thing. Apparently the usual way to rename files in Linux is to [m]o[v]e them like this:
mv oldfilename newfilenameIf you realise that [c]o[p]y is cp, [m]o[v]e is mv, then you may think that [r]ena[m]e is rm. That would be a bad thing, because rm is actually [r]e[m]ove. Apparently no-one thinks this is all utterly bizarre.
Linux Basics - Download and Run Files
In general most advanced distributions of Linux are far more sensible about software installation than windows. Instead of having programs scattered far and wide across the interweb, they are usually collected together in a collection, or repository of files.
Sometime software will depend to some extent on other pieces of software. In windows this can manifest itself in the need for visual basic runtimes, or .net installations. You download a useful looking bit of software, install it, and run it only to find you need to download a FURTHER application 10 times the size just to get the sod to work.
No difference in Linux, except, as I say with more advanced distributions. What is important about the repositories is that not only is all the software in the same place BUT each bit of software knows what OTHER bits of software from the same repository it needs to run. So when you install the software it automatically downloads and installs all the other software it needs to function.
However, sometimes you do want to install some software from outside the standard repositories. If you try to do this in the windows way (right click link, save to disk, double click resulting icon, you are fucked. But it will not tell you what has gone wrong.
What you need to do is tell Linux it can run, or execute the program you have just downloaded. You can do this using most file managers by right clicking, looking for 'permissions'. There should then be an option, probably a checkbox, to turn on the 'execute' permission for the file. Alternatively you can do this on the command line by running the command:
Sometime software will depend to some extent on other pieces of software. In windows this can manifest itself in the need for visual basic runtimes, or .net installations. You download a useful looking bit of software, install it, and run it only to find you need to download a FURTHER application 10 times the size just to get the sod to work.
No difference in Linux, except, as I say with more advanced distributions. What is important about the repositories is that not only is all the software in the same place BUT each bit of software knows what OTHER bits of software from the same repository it needs to run. So when you install the software it automatically downloads and installs all the other software it needs to function.
However, sometimes you do want to install some software from outside the standard repositories. If you try to do this in the windows way (right click link, save to disk, double click resulting icon, you are fucked. But it will not tell you what has gone wrong.
What you need to do is tell Linux it can run, or execute the program you have just downloaded. You can do this using most file managers by right clicking, looking for 'permissions'. There should then be an option, probably a checkbox, to turn on the 'execute' permission for the file. Alternatively you can do this on the command line by running the command:
chmod +x /path/to/nameoffileThis [ch]anges the [mod]e of the file [nameoffile] in the directory [/path/to] by [+]adding the e[x]ecute permission, but only for the current user. This means that if you have any other user accounts on the system, they will not be able to execute the file, which may be fine by you. To allow [a]ll users to execute the file, put an 'a' before the '+' sign, so it looks like this:
chmod a+x /path/to/nameoffileBy way of example, here is how you download and install Adobe's 'air' application:
wget http://airdownload.adobe.com/air/lin/download/1.5/AdobeAIRInstaller.binYou can just copy and paste all three of those commands into a terminal window and it will install. You do not need to open your browser. The first command goes to a file on the [w]eb and [get]s it for you. It downloads the file to the directory you run the command from. We should now know what the second command does. The third command executes the file from [./] the current directory.
chmod +x AdobeAIRInstaller.bin
./AdobeAIRInstaller.bin
Linux Basics - Network Connection Details
If converting from windows, and you find yourself without a network connection (highly likely if using wireless) do not hammer in 'ipconfig', for it shall not work. Try 'ifconfig' instead.
Sunday, 20 September 2009
Linux Basics - Copy/Paste in Terminal
One of the things about linux which really irritates me is the complete lack of documentation of the first things you have to learn. It is as if once people learn these lessons, they do not give them a second thought and assume that the next generation will also absorb them by osmosis.
In a valiant attempt to stop that happening, I present some basics:
To copy text in a terminal window, do not highlight it and press CTRL+C. God no, that would be - oh what's the word - fucking logical. Instead highlight the text and either right click and select copy, or press CTRL+ALT+C.
To paste the text you have just copied, do not try CTRL+V ... etc ..., press CTRL+ALT+V.
In a valiant attempt to stop that happening, I present some basics:
To copy text in a terminal window, do not highlight it and press CTRL+C. God no, that would be - oh what's the word - fucking logical. Instead highlight the text and either right click and select copy, or press CTRL+ALT+C.
To paste the text you have just copied, do not try CTRL+V ... etc ..., press CTRL+ALT+V.
Thursday, 10 September 2009
Linux Documentation
I have complained before about the really crappy documentation that you encounter when trying to trawl through linux manuals. Two recent examples may shed some light on the nature of my complaint.
Firstly, in my last post I talked about the xdg-mime command and how it is used to change the default application for various filetypes. What I did not say was how frustrating the documentation was to deal with. For instance, go and look at the manual page for xdg-mime. It all starts well enough:
Slowly the light dawns. When it says 'filetype' that is not a variable, that is literally what you type. So you follow 'xdg-mime query' with the word 'filetype'. Right, brilliant. So why the fuck could the error report not say:
OK, so we follow 'xdg-mime query' with either "filetype" or "default". I can follow that. Fine. So what do I type after filetype or default? Lets see...
Then a further little light dawns. See the colon at the end of the filename? What if maybe, just maybe, that shouldn't be fucking there? What if the instructions, which specifically appended a colon to the end of the filename, and which I am following carefully, not just being slap happy with my colons in general, were put together with all the skill and panache of a recovering alcoholic with the DTs trying to construct a house of cards? Leave off the colon = command works as it should. Genius.
Secondly, I have been farting around with the larch system for making live usb installations of Arch. One of which I am using to post this, as a matter of fact. To cut a long story short, I wanted to add some extra packages to the install which were not in the repositories. The Larch manual states:
So I then run the command on the directory I have assembled my custom packages in. It makes a new file in that directory called nameofdirectory.db.tar.gz.
Right so I ask you now - how do I "place an entry for this new repository in" my pacman.conf file? I try referencing this new file directly in the Server: line. That doesn't work. I try just making the server line link to the directory the new file is in. That still doesn't work.
I eventually discover, through trial and error no less, that what I should have been doing was to have the Server: line point to the directory the new file was in, uncomment the line #[custom] above AND change the word 'custom' in it to the NAME of the new file LESS the .db.tar.gz bit. Oh - of course, silly me, how fucking simple. I mean, it is all laid out so clearly in those helpful manual files. All these steps are so fucking transparent I nearly walked right into them.
Give me fucking strength. Is it something to do with linux? Are the developers so fucking delighted to get their software to actually work that they piss off down the pub as soon as it compiles? With the inevitable result that they are shit-faced drunk when it comes to writing the documentation? And then, THEN, when you ask a question you are told to RTFM? Really? Well stick your RTFM right UYFA.
Firstly, in my last post I talked about the xdg-mime command and how it is used to change the default application for various filetypes. What I did not say was how frustrating the documentation was to deal with. For instance, go and look at the manual page for xdg-mime. It all starts well enough:
xdg-mime — command line tool for querying information about file type handling and adding descriptions for new file typesThat's a nice intro, and sets the scene well. We know what we are talking about. Also, the description gives us some more useful information:
The xdg-mime program can be used to query information about file types and to add descriptions for new file types.Good. Good. Keep it coming. Lets have a look at the synopsis of the command:
xdg-mime query { filetype | default }Right, so we type "xdg-mime query" and then what? Oh - filetype. Right, so I am interested in PDFs. Lets try:
xdg-mime query pdfAaaaaaand:
xdg-mime: unknown query type 'pdf'Fucking great. The system must know about PDFs because it is opening them now (with GIMP, which is fucking annoying and the whole point of this little command line adventure). What could I be doing wrong?
Slowly the light dawns. When it says 'filetype' that is not a variable, that is literally what you type. So you follow 'xdg-mime query' with the word 'filetype'. Right, brilliant. So why the fuck could the error report not say:
xdg-mime: unknown query type 'pdf'. Valid querys are 'filetype' and 'default'.It's not that hard to type out six words.
OK, so we follow 'xdg-mime query' with either "filetype" or "default". I can follow that. Fine. So what do I type after filetype or default? Lets see...
query filetype FILE: Returns the file type of FILE in the form of a MIME type.Right, so I now try:
xdg-mime query filetype forfuckssake.pdf:Aaaaaand:
xdg-mime: file 'forfuckssake.pdf:' does not existYes it fucking does I am looking at it! So I check the spelling, and the path. I try "./" before the filename, because god knows linux gets picky about finding stuff not in the path - even when you are in the same fecking directory as the file you want to use! Nada.
Then a further little light dawns. See the colon at the end of the filename? What if maybe, just maybe, that shouldn't be fucking there? What if the instructions, which specifically appended a colon to the end of the filename, and which I am following carefully, not just being slap happy with my colons in general, were put together with all the skill and panache of a recovering alcoholic with the DTs trying to construct a house of cards? Leave off the colon = command works as it should. Genius.
Secondly, I have been farting around with the larch system for making live usb installations of Arch. One of which I am using to post this, as a matter of fact. To cut a long story short, I wanted to add some extra packages to the install which were not in the repositories. The Larch manual states:
It is possible to include your own 'custom' packages in the installation. Maybe ones you have compiled yourself, e.g. from the AUR, or modified versions (fixes or customizations) of standard packages. To do this you need to put your packages in a directory and run gen-repo - which requires python - on this directory (run it without arguments to get usage instructions). Then place an entry for this new repository in your 'pacman.conf' (in the profile or else in the working directory). If your packages replace some in the existing repositories, your custom repository needs to come before those repositories in 'pacman.conf'. Any packages you want installed now just need to be listed in addedpacks.Larch also sets up a pacman.conf file which contains this little nugget of information:
# An example of a custom package repository. See the pacman manpage forThis sounds promising and looks straightforwards. So I put my packages in a directory, run gen-repo and make a change to pacman.conf. Only I can't fucking find gen-repo. I mean it is not in the directory I installed larch into. Where the fuck can it be? I eventually trace it to ./larch/run/ where I find it is actually called gen_repo, not gen-repo. Fan-fucking-tastic waste of time.
# tips on creating your own repositories.
#[custom]
#Server = file:///path/to/custom
So I then run the command on the directory I have assembled my custom packages in. It makes a new file in that directory called nameofdirectory.db.tar.gz.
Right so I ask you now - how do I "place an entry for this new repository in" my pacman.conf file? I try referencing this new file directly in the Server: line. That doesn't work. I try just making the server line link to the directory the new file is in. That still doesn't work.
I eventually discover, through trial and error no less, that what I should have been doing was to have the Server: line point to the directory the new file was in, uncomment the line #[custom] above AND change the word 'custom' in it to the NAME of the new file LESS the .db.tar.gz bit. Oh - of course, silly me, how fucking simple. I mean, it is all laid out so clearly in those helpful manual files. All these steps are so fucking transparent I nearly walked right into them.
Give me fucking strength. Is it something to do with linux? Are the developers so fucking delighted to get their software to actually work that they piss off down the pub as soon as it compiles? With the inevitable result that they are shit-faced drunk when it comes to writing the documentation? And then, THEN, when you ask a question you are told to RTFM? Really? Well stick your RTFM right UYFA.
Monday, 7 September 2009
VGA Screen on Boot
When booting a PC before you get to the spanky graphical interface it defaults to a crummy text based interface with 80 columns, each with 25 rows. Or is it 80 rows of 25 columns?
Anyway.
It looks crap. Most operating systems try to hide this from you, whether it be with a Windows 98 graphic, an XP flag, Vista's minimalist approach, or Ubuntu's orange Knight Rider-esque effort. Behind the fancy graphics, and the desperate cylon impression, a whole lot is going on. Messages whirr past as various parts of the PC spring into life - hard disk here, clock there, now a network connection, there a keymap configuration. Some mature operating systems let you see what is going on, presumably on the basis that if you are experienced enough to be using them, you won't soil yourself when you see some system messages in text.
The down side to this is that the messages REALLY whirr past when you only have 25 rows available to display them. The solution is to choose another screen format to use on boot. I first saw this approach on Mac OSX, and I thought it looked really good. So - how to get this with Linux?
It turns out that it is really easy - you just add
I did this.
It did not work.
I got a message to the effect that the mode I sought could not be found. Or something equally fucking useless in terms of diagnostics. If you have clicked through to the link above you will see how many mode numbers there are. I tried them. None of them fucking worked. I tried using hex numbers instead - by prefixing the hex translation with '0x' (so 0x317 is 773). It didn't fucking work. Every search I tried on this offered up the helpful advice of "try adding vga=xxx to the end of your kernel line by ...". Fucking great.
It was after several hours of frustration that I hit on a brilliant idea. You see, I also have a 30" LCD TV connected by VGA to another PC. The TV can do 1280x768, and thus is technically HDTV ready. However, I bought it before the whole HDTV thing kicked off, so it doesn't claim to be HDTV ready, and it doesn't have an HDMI port. Monitors tell the PC what resolutions they support by way of the EDID system. Using XP originally, it was only detected as a 1024x768 monitor, but the Nvidia drivers for XP allow you to over-ride the detected resolutions. So I could happily use it as a 1280x768.
In due course I upgraded the machine to Vista, mainly to benefit from the more mature Media Center software. Again the monitor defaulted to 1024x768. No problem, thought I, just tell the nvidia driver to over-ride this back to 1280x768. Clicky-clicky. Hmm, can't seem to find the option for this. Googly-googly. Vista will NOT let drivers over-ride the settings from the monitor. Oh for fucks sake. I am not 12. At this point I descended into a hell of Powerstrip settings, EDID bios reprogramming, and (worst of all) INCORRECT FUCKING ASPECT RATIOS. All of this just because some incompetent half-wit can't program a fucking bios chip with the correctly supported screen resolutions. How hard can it be? 1024x768, 1280x768 - there you go I managed it fine!
On the third day I rose, clutching a pair of pliers, a DVI pin out diagram, and a VGA-DVI adaptor. Once I had ripped out the pins that communicated the WRONG information about the TV to the PC, Vista would let me set the resolution to whatever the hell I liked. Fantastic.
So, back to our story. I thought to myself, could the monitor be lying its arse off to the bios? I mean, sure it works fine once you have booted a gui, but maybe Captain Hamfisted Knobcheese III, EDID bios programmer extraordinaire is back on the scene. I found somewhere the boot option:
Anyway.
It looks crap. Most operating systems try to hide this from you, whether it be with a Windows 98 graphic, an XP flag, Vista's minimalist approach, or Ubuntu's orange Knight Rider-esque effort. Behind the fancy graphics, and the desperate cylon impression, a whole lot is going on. Messages whirr past as various parts of the PC spring into life - hard disk here, clock there, now a network connection, there a keymap configuration. Some mature operating systems let you see what is going on, presumably on the basis that if you are experienced enough to be using them, you won't soil yourself when you see some system messages in text.
The down side to this is that the messages REALLY whirr past when you only have 25 rows available to display them. The solution is to choose another screen format to use on boot. I first saw this approach on Mac OSX, and I thought it looked really good. So - how to get this with Linux?
It turns out that it is really easy - you just add
vga=xxxto the end of your kernel line (where xxx is a three digit number). You can do this by either editing your /boot/grub/menu.lst file or by opting to choose a kernel on boot, pressing 'e' to edit the kernel and adding that text at the end.
I did this.
It did not work.
I got a message to the effect that the mode I sought could not be found. Or something equally fucking useless in terms of diagnostics. If you have clicked through to the link above you will see how many mode numbers there are. I tried them. None of them fucking worked. I tried using hex numbers instead - by prefixing the hex translation with '0x' (so 0x317 is 773). It didn't fucking work. Every search I tried on this offered up the helpful advice of "try adding vga=xxx to the end of your kernel line by ...". Fucking great.
It was after several hours of frustration that I hit on a brilliant idea. You see, I also have a 30" LCD TV connected by VGA to another PC. The TV can do 1280x768, and thus is technically HDTV ready. However, I bought it before the whole HDTV thing kicked off, so it doesn't claim to be HDTV ready, and it doesn't have an HDMI port. Monitors tell the PC what resolutions they support by way of the EDID system. Using XP originally, it was only detected as a 1024x768 monitor, but the Nvidia drivers for XP allow you to over-ride the detected resolutions. So I could happily use it as a 1280x768.
In due course I upgraded the machine to Vista, mainly to benefit from the more mature Media Center software. Again the monitor defaulted to 1024x768. No problem, thought I, just tell the nvidia driver to over-ride this back to 1280x768. Clicky-clicky. Hmm, can't seem to find the option for this. Googly-googly. Vista will NOT let drivers over-ride the settings from the monitor. Oh for fucks sake. I am not 12. At this point I descended into a hell of Powerstrip settings, EDID bios reprogramming, and (worst of all) INCORRECT FUCKING ASPECT RATIOS. All of this just because some incompetent half-wit can't program a fucking bios chip with the correctly supported screen resolutions. How hard can it be? 1024x768, 1280x768 - there you go I managed it fine!
On the third day I rose, clutching a pair of pliers, a DVI pin out diagram, and a VGA-DVI adaptor. Once I had ripped out the pins that communicated the WRONG information about the TV to the PC, Vista would let me set the resolution to whatever the hell I liked. Fantastic.
So, back to our story. I thought to myself, could the monitor be lying its arse off to the bios? I mean, sure it works fine once you have booted a gui, but maybe Captain Hamfisted Knobcheese III, EDID bios programmer extraordinaire is back on the scene. I found somewhere the boot option:
edd=offThis stops the monitor bullshitting the PC about what it can and cannot do. Tried it. It works. Genius. So if you continue to have problems after using vga=xxx, then you need to add this to get your funky VGA graphics on boot:
edd=off vga=xxx
Subscribe to:
Posts (Atom)